爱客仕-前端团队博客园

vue2来了,vue2+vuex2+vue-router2

一切从vue-cli开始

知乎上1个问题,学v1还是v2,引用一个回复

凡事为啥一定要纠结呢?这世上除了二选一,非黑即白以外,其实往往会有第三个选择。
当然是可以一起学的呀!
真正做东西用 Vue 1.x,做的时候你才会遇到远比框架本身更多的问题,然后顺着报错信息到网上找答案,这时候才是展现生态力量的时候。
而与此同时,看看 Vue 2.x 的源码,就当学习 ES6 语法、API 设计、项目构建等等,不要忘了框架作为一个「项目」本身也是有很多值得学习的地方。

马上装起来,必须先全局安装vue-cli

1
2
npm install -g vue-cli
vue init webpack my-project

ps:默认安装vue2,要回顾vue1的,可以用

1
vue init webpack-simple#1.0 mynewproject

vue

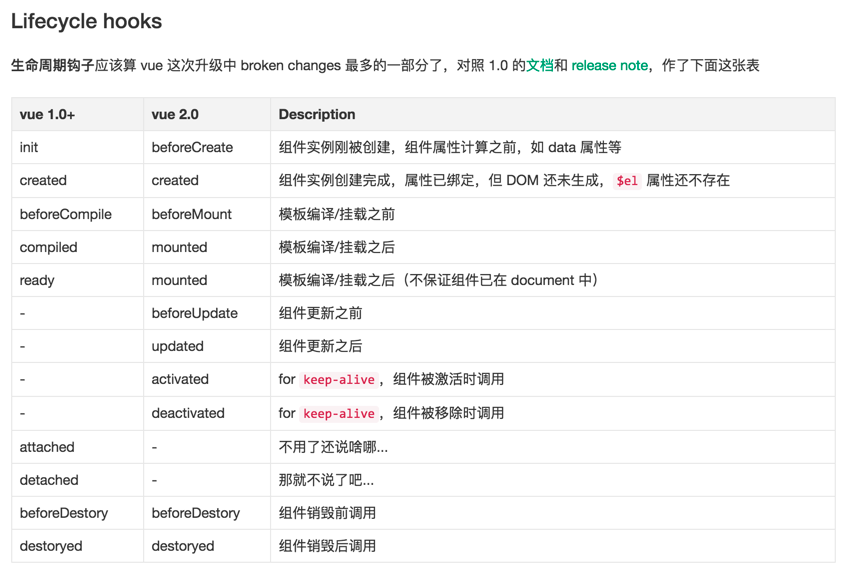
  • 生命周期重生了1下下,ready死了, 来了mounted, 当然还有更多
    附图
  • input修饰符,lazy[双向绑定事件在change,而不是input], number[转为 Number], trim[去前后空格]
  • v-for,排序筛选都在数据中直接处理,没有了track-by和内置的过滤器filterBy, orderBy
  • 纯HTML代码应用(比如要放个富文本详情),不用3对{},换成<div v-html="rawHtml"></div>
  • 组件props,单向绑定,去掉了v1中的sync,父组件使用 $on(eventName) 监听事件,子组件使用 $emit(eventName) 触发事件

节选1个简单的提示框组件代码

1
2
3
4
5
<transition name="fade">
<div v-show="!!msg" class="tips">
<p>{{ msg }}</p>
</div>
</transition>
1
2
3
4
5
6
.fade-enter-active, .fade-leave-active{
transition: opacity .5s;
}
.fade-enter, .fade-leave-active{
opacity: 0;
}
1
2
3
4
5
6
7
8
9
10
11
12
13
14
15
16
17
18
19
20
21
22
23
props: {
/** @param {string} msg 小窗提示内容*/
msg: {
type: String,
default: ''
}
},
methods: {
close () {
/** @function close 有值时在2秒后清空内容并回传props */
if (this.msg) {
let timer = setTimeout(() => {
this.$emit('autoClose')
clearTimeout(timer)
}, 2000)
}
}
},
watch: {
msg () {
this.close()
}
}

嗯,组件名就叫tip吧,用起来

1
<tip :msg="msg" v-on:autoClose="closeTip"></tip>
1
2
3
4
5
methods: {
closeTip () {
this.msg = ''
}
}
  • 示例中用到了<transition name="fade">xxx</transition>,回忆下v1用的<p transition="fade">xxx</p>,感觉更贴切了吧~

vue-router

1
npm install --save vue-router

main.js里用起来

  • router.start么有了,回忆下v1用的router.start(App, ‘#app’),现在v2是在vue实例里render(渲染)
  • router.map么有了,直接作为配置项了
  • routes是个对象数组了,嵌套路由的参数名变了,它还是个孩子。。。呵呵呵
  • 重定向也放进去了,不单独写了
1
2
3
4
5
6
7
8
9
10
11
12
13
14
15
16
17
18
19
20
21
22
23
24
25
26
27
28
29
30
import Vue from 'vue'
import VueRouter from 'vue-router'
import App from './App.vue'
Vue.use(VueRouter)
const router = new VueRouter({
routes: [
{
path: '/',
component: App,
children: [
{
path: '/app',
component: App
}
]
},
{
path: '*',
redirect: '/'
}
]
})
new Vue({
el: '#app',
router,
render: h => h(App)
})

router 的实例方法

  • v-link么有了,router-link生成一个链接到to的a标签,可以用tag切换DOM类型,如tag=”li”
1
2
<router-link to="home">Home</router-link>
<router-link :to="{ name: 'user', params: { userId: 123 }}">User</router-link>
  • $route.router.go()变成router.push(),不要history用router.replace()
1
2
router.push({ name: 'user', params: { userId: 123 }})
router.replace(location)
  • router.go(n)类似 window.history.go(n),代表后退n步

vuex

1
npm install --save vuex

main.js里用起来

  • 引入方式不变
1
2
import Vuex from 'vuex'
Vue.use(Vuex)

新东西 map全家桶,官话:少按几个键(^_^)

  • mapState,在computed里直接获取state里的值
1
2
3
4
5
6
7
8
9
10
11
12
13
14
15
16
computed: {
localComputed () { /* ... */ },
// 需求:我就是想要个state.count,3种套路,任君挑选
// 使用对象扩展运算符,将 mapState 返回的对象和外层其他计算属性混合起来
...mapState({
// 1、箭头函数,v1的时候都那么用
count: state => state.count,
// 2、别名,简便写法,用起来更随意哟
countAlias: 'count',
}),
// 3、这样写最省力,注意,这边是数组哟
...mapState([
// 映射 state.count 到 this.count
'count'
])
}
  • mapGetters,单独用”getters”,先在store定义”getters”
1
2
3
4
5
6
7
8
9
10
11
12
13
14
15
// getters
export const doneTodosCount = state => state.todos.filter(todo => todo.done)
// 在页面中使用,也是3种套路
computed: {
...mapGetters([
'doneTodosCount'
]),
...mapGetters({
add: 'other'
}),
doneTodosCount () {
return this.$store.getters.doneTodosCount
}
}
  • mapAction,单独用”dispatch”,先在store定义”actions”
1
2
3
4
5
6
7
8
9
10
11
12
13
14
15
// actions
export const increment = ({ commit }) => { commit('increment') }
// 在页面中使用,还是3种套路
methods: {
...mapActions([
'increment' // 映射 this.increment() 到 this.$store.dispatch('increment')
]),
...mapActions({
add: 'increment' // map this.add() to this.$store.dispatch('increment')
}),
increment() {
this.$store.dispatch('increment')
}
}
  • mapMutations,Mutation 必须是同步事务,可以直接动Mutation啦~
1
2
3
4
5
6
7
8
9
10
11
12
// 在页面中使用,对,就是3种套路
methods: {
...mapMutations([
'increment' // 映射 this.increment() 到 this.$store.commit('increment')
]),
...mapMutations({
add: 'increment' // 映射 this.add() 到 this.$store.commit('increment')
}),
increment() {
this.$store.commit('increment')
}
}
1
2
3
4
5
parserOptions: {
ecmaFeatures: {
'experimentalObjectRestSpread': true
}
},

官方升级小助手

咬咬牙,升级吧!!!v1的文档都快被归档了。。。

1
2
3
4
5
6
7
8
9
10
# install
npm install --global git://github.com/vuejs/vue-migration-helper.git
# navigate to a Vue 1.x project directory
cd path/to/my-vue-project
# scan all files in the current directory
vue-migration-helper
# scan all files in specific sub-directories
vue-migration-helper src folder-a folder-b